
In this informative video, we’re diving into the essential task of regripping your golf clubs. This guide will help streamline your swing and enhance your feel on the course. Regripping at home can seem daunting, but with the right approach, it’s both simple and cost-effective. Follow along to give your clubs the upgrade they deserve!
Regripping Your Golf Clubs
In this tutorial, learn the straightforward techniques to regrip your clubs. With a focus on easy-to-follow steps, we help you navigate each part of the process safely and efficiently. Whether you’re a seasoned pro or a beginner, you’ll find valuable tips to ensure a perfect grip every time.
Table of Contents
Summary
This guide provides a comprehensive overview of regripping your golf clubs. From gathering necessary tools to safely removing the old grip, each step is outlined for ease of use. The importance of patience and precision is emphasized to ensure the grip is applied correctly. The process concludes with allowing the grip to cure, ensuring durability and performance.
Introduction
Hey everyone, and welcome back to the channel! Today, we’re tackling an important task – regripping your golf clubs – which can significantly improve your feel and performance on the golf course. Although regripping might seem intimidating at first, with the right tools and a few simple steps, you can easily do it yourself at home and save some cash.
Tools and Safety
Before we dive in, here’s a quick rundown of what you’ll need. First, remember: Safety First! A utility knife is essential, but sharp objects deserve respect, so be careful while using it. To clean up, gather some masking tape and mineral spirits or rubbing alcohol to remove any leftover residue.
For gripping essentials, you will need double-sided tape for a secure fit, grip solvent to create that perfect bond, and lastly, the stars of the show – your brand new golf grips. Choose wisely based on your grip size and swing style. With everything prepped, let’s get down to business!
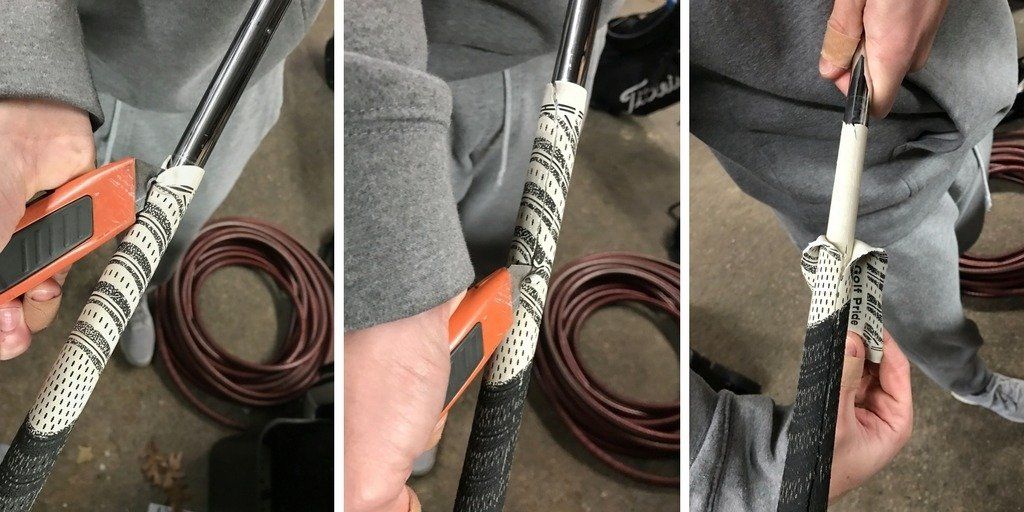
Removing the Old Grip
Step One: Saying goodbye to the old grip. Grab your utility knife and carefully make a slit lengthwise down the old grip. Be gentle and avoid digging into the shaft underneath. Once you have a clean cut, slowly peel the old grip away from the shaft. Take your time and wiggle it loose gradually to prevent any damage to the shaft.
Feel free to put a bit of grip solvent on the spot you’re cutting before you peel it off. If necessary, you can use lighter fluid, but specialized solvent works best. The goal is to get the solvent under the grip, between the club shaft and the grip. Next, take off the tape from the shaft. You can use a straight razor or try peeling it off. Make sure to clean the shaft where the old grip and tape were, and let it dry completely to ensure a strong bond with the new grip.
Applying the New Grip
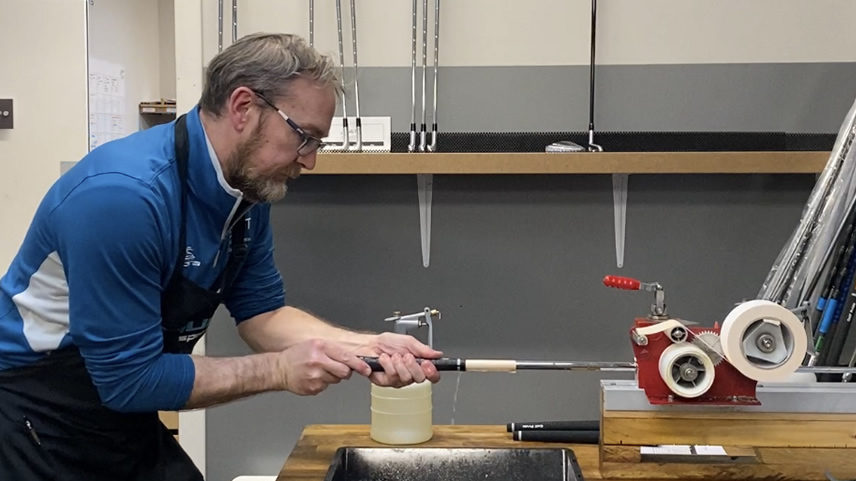
Next, put double-sided tape on the same spot. Take off the backing from the other side of the tape. You can use special GF grip tape or any tape from a hardware store. Place the tape down the shaft where the new grip will go. Start wrapping the double-sided tape from the thicker end of the shaft, making sure to wrap it neatly and evenly without any wrinkles or air bubbles; a smooth wrap is important for a good grip.
Apply a thin layer of grip solvent to the exposed shaft and the inside of the new grip. This solvent activates the adhesive properties and creates a strong bond between the grip and the shaft. Be mindful not to overdo it; a thin layer is sufficient. Carefully slide the new grip onto the shaft, aligning it properly.
Here’s a pro tip! Grips often have a logo or design, so make sure this design is facing the right way when you slide it on. Double-check the grip’s position before the solvent sets. You only get one shot at this, so make it count!
“Patience is key here – let the grip cure for at least 24 hours or follow the manufacturer’s instructions.”
Conclusion
Congratulations! You’ve successfully regripped your golf club. Regripping is a valuable skill for enhancing your game without breaking the bank, and now you’re equipped to do it just like a pro. Remember to allow the grip to cure properly before teeing off. Not only will this ensure the durability of the grip, but it will also enhance your on-course performance.
We hope this video has empowered you to regrip your clubs with confidence. If you enjoyed this tutorial, don’t forget to hit the like button and subscribe to our channel for more golfing tips and tricks.
Thanks for watching! May your swings be smooth and your grips secure!